Wrapping and aligning text comes very useful to organize and format our data.When we enter a lot of data into cell, by default, what happens is that some of the text gets hidden by the cells adjacent to it. The figure below explains the point.
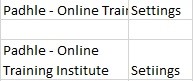
However, this can be prevented by ‘wrapping the text’. What this means is that, all the text entered in a cell, will remain within it and visible to the user.
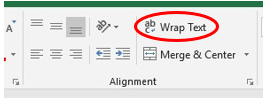
Wrapping and Aligning Text-Where to Find ‘Wrap Text’ option?
One can find this option in the ‘Home’ menu under the ‘Alignment’ grouping.
Wrapping and Aligning Text-How to Wrap a Text?
Geeta was entering the details of her summer camp when she noticed that some of the text she entered was not visible. How can she help the situation? She can use the ‘Wrap Text’ option as follows.
Select the cell or cells that she wants to have wrapped text. She can then drag using the fill handle to select a range of cells. Now click on the ‘Wrap Text’ option. All the text that she enter in these cells will now be wrapped.
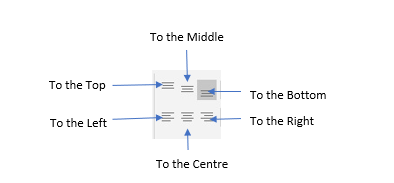
Wrapping and Aligning Text-What is Aligning?
Aligning means to organize the data entered in such a way that all the text is oriented in a particular way.
In MS Excel, one can align the text as follows
- To the left
- To the right
- At the centre
- To the top
- To the bottom
- At the middle
Wrapping and Aligning Text-How to Align Text in Excel?
Now that Geeta has wrapped the text, she wants to know how it can be aligned. These are the options she has.
I.To the Left
First, select the cell or range of cells she wants to align. Now click on the ‘Left Align’ button in the ‘Alignment’ grouping.

II.To the Right
First select the cell or range of cells she wants to align. Now click on the ‘Right Align’ button in the ‘Alignment’ grouping.

III.To the Centre
First select the cell or range of cells she wants to align. Now click on the ‘Centre Align’ button in the ‘Alignment’ grouping.

IV.To the Top
First, select the cell or range of cells she wants to align. Now click on the ‘Top Align’ button in the ‘Alignment’ grouping.

V.To the Bottom
First, select the cell or range of cells she wants to align. Now click on the ‘Bottom Align’ button in the ‘Alignment’ grouping.

VI.To the Middle
First, select the cell or range of cells she wants to align. Now click on the ‘Middle Align’ button in the ‘Alignment’ grouping.

Hope you have clear understanding of how to wrap the text in excel now.