Before taking the printout of your Excel Sheet, a user may want to customize the Print Setup. This article will introduce you to the various options that you can use to optimize your printing.
- Size
- Print Area
- Print Tiles
- Scale to Fit
Print Setup-Size in Excel
While printing, one has to make sure that the size of the sheet is the same as the size of the sheet on which you are going to take the printout. To do this, click on the ‘Size’ option from the ‘Page Setup’ group in the ‘Page Layout’ menu. A dropdown list will now appear from which you can select the size of the sheet you will be using.
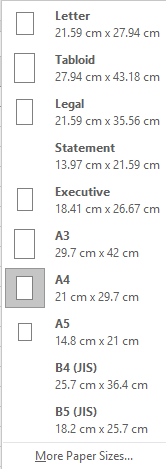
In case the size is not available in the list, you can choose the ‘More Paper Sizes’ option and customize it in the dialogue box that appears.
Print Setup-Print Area in Excel
If you want to print a certain range of cells but not the entire sheet, you can do this by first selecting the range and then clicking on the ‘Print Area’ option from the ‘Page Setup’ group in ‘Page Layout’ menu. From the dropdown list that appears, you can select ‘Set Print Area’ option.
In case you want to remove this setting, simply go to the ‘Print Area’ option again and click on ‘Clear Print Area’ option.
Print Setup-Print Tiles in Excel
If you want to print multiple range of cells in the same sheet at once, you can use the ‘Print Tiles’ option.
Go to the ‘Print Tiles’ option in the ‘Page Setup’ group of ‘Page Layout’ menu. The following dialogue box will appear.
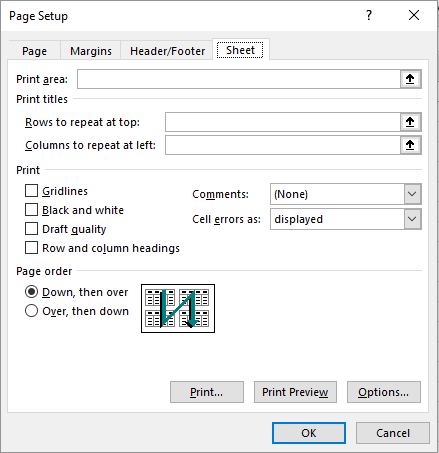
You can select the ‘Print Area’ by specifying the range in the ‘Print Area’ textbox. If you would like the first column and the first row (which usually have headings) to be repeated for each tile, select these ranges in the respective boxes. You can check the respective boxes if you want the gridline and the headings of rows and columns to be printed. You can check the ‘draft quality’ checkbox if it is applicable. Check the ‘Black and White’ checkbox if you want the sheet to be printed in black and white. Under ‘Page Order’, select the respective checkbox depending upon if you want the tiles to be printed in the down and over order or the over and down order.
Print Setup-Scale to Fit in Excel
You can check how many spreadsheets should fit one page width-wise and height-wise by selecting the options in the ‘Width’ and ‘Height’ dropdown lists in the ‘Scale to Fit’ group in the ‘Page Layout’ menu.
You can also select the fit percentage in the ‘Scale’ list in the ‘Scale to Fit’ group in the ‘Page Layout’ menu.

Example:
Ron wants to print a range of cells from D2 to D30 of an Excel Sheet. How can he print only these cells?
Solution:
He should select the range from D2 to D30 by dragging and then clicking on the ‘Print Area’ option from the ‘Page Setup’ group in ‘Page Layout’ menu. From the dropdown list that appears, he can select ‘Set Print Area’ option. He can now go to the ‘File’ menu and give the ‘Print’ option.