What is ‘Find and Replace’?
Often, when we are working upon a worksheet, it is possible that we make errors. Find and Replace is an easy method by which one can find these cells and replace them with the desired values.
Why use ‘Find and Replace’?
Find and Replace saves a lot of time and makes it efficient and less cumbersome than manually changing these values by going to each cell.
Where is ‘Find’ and ‘Replace’ located?
‘Find’ and ‘Replace’ are found as options of the ‘Find and Select’ dropdown list in the ‘Home’ menu of the ribbon, in the ‘Editing’ group.

How to Use ‘Find and Replace’?
Rohini has received a spreadsheet from Rohan that has the details of a meeting but by mistake, he has entered ‘b’ in the place of all sixes. Rohini wants to find all the ‘b’s and see if there are a lot of obvious errors. How can Rohini rectify this error without having to manually go through each cell? She can use the ‘Find’ option to do this.
1.Find in Excel
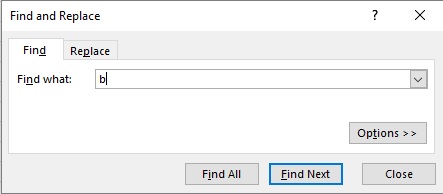
Rohini should click on the ‘Home’ menu and select the ‘Find and Select’ option in the ‘Editing’ group. From the dropdown list she can choose ‘Find’. The ‘Find and Replace’ dialogue box will appear as shown below. She should select the ‘Find’ menu and type ‘b’ in the ‘Find what’ textbox.
In case she want to specify the search more, she can click on the ‘Options>>’ button found to the lower right side of the textbox. This will expand the dialogue box as follows, giving her more options.
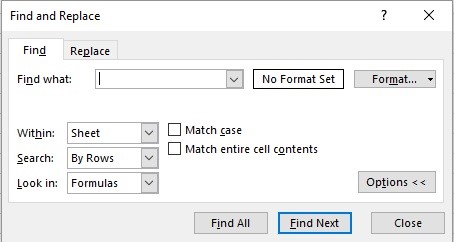
In the ‘Within’ dropdown list, she has two options: ‘Sheet’ and ‘Workbook’. She can specify if she wants to search for the data just within this sheet or the entire workbook.
In the ‘Search’ dropdown list she has got the options of ‘By Rows’ and ‘By Columns’. She can select if she wants to search for the given text first through the rows or columns.
In the ‘Look in’ option she can specify if she wants to look for the data in the formulas, the results of these formulas, in the comments section or the values entered. The dropdown list has three options ‘Formulas’, ‘Values’ and ‘Comments’.
The other specifications she can provide are ‘Match case’ and ‘Match entire cell contents’. She can select the check box if she wants her search to be case sensitive and select the second one if she wants the entire contents of the cell to match with the text in the ‘Find what’ textbox.
After she is done, she can click on ‘Find All’. This will give her a list on the bottom side of her dialogue box showing the results.
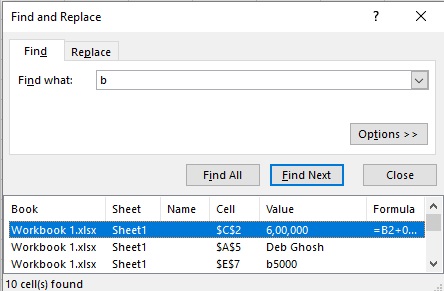
If the first option is not the one she is looking for, she can simply click on ‘Find Next’ to go to the next one.
Finally, she can click on ‘Close’ after she has found the cells she wanted.
2. Replace in Excel
Rohini has seen that there are quite a few mistakes and now she’d like to change them. She can do this easily by following these steps using the ‘Replace’ option.
She should, firstly, click on the ‘Home’ menu and select the ‘Find and Select’ option in the ‘Editing’ group. From the dropdown list she should choose ‘Replace’.
After this, she should enter ‘b’ in the ‘Find what’ textbox and the ‘6’ in the ‘Replace’ textbox.
In case she wants to specify the search more, she can click on the ‘Options>>’ button found to the lower right side of the textbox. This will expand the dialogue box as follows, giving her more options like ‘Within’, ‘Search’, ’Look In’, ‘Match case’ and ‘Match entire cell contents’. These have the same functions as discussed under ‘Find’.
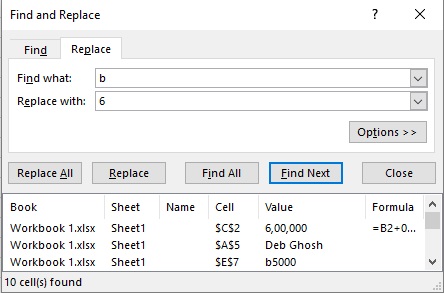
She should then click on ‘Find All’ once she is done. She will get a list on the bottom side of her dialogue box showing her the results. If the first option is not the one she is looking for, she can simply click on ‘Find Next’ to go to the next one.
Now, she can click on ‘Replace’ once she has found the cell she wanted the data to be replaced with. She should choose ‘Replace All’ if she wants to replace the data for all the search results.
Lastly, she should click on ‘Close’ once she is done.