Defining and managing names in Excel can make ur lives easier. One can use names to refer to a range of cells to make it more convenient for navigation and efficient. In this module we will learn about
- How to Define a Name for a Range of Cells
- How to Define a Name by Using a Range of Cells
- How to Define a Name by Using ‘New Name’ Dialogue Box
- How to Manage Names
Defining and Managing Names in Excel – Where to Find the ‘Define Name’ and ‘Name manager’ options?
The ‘Define Name’ and ‘Name Manager’ options under the ‘Defined Names’ grouping in the ‘Formulas’ menu.
How to Define a Name for a Range of Cells?
Step 1: Select the cells you want to name. These maybe a continuous selection or a discontinuous selection.
Step 2: Click on the ‘Name Box’ found to the left-hand side of the ‘Formula Bar’. Enter a suitable name.
While naming cells, there are a few rules to be kept in mind.
- The first character of the name has to be an alphabet, a backlash or an underscore.
- The rest of the name may only contain alphabets, underscores, full stops and numbers.
- One can not refer to cells in the name
- One can not have spaces while naming a cell
- The maximum length of a name allowed is 255 characters
- Excel is not case sensitive
Step 3: Press ‘Enter’ once you are done.
Defining and Managing Names in Excel – How to Define a Name by Using a Range of Cells?
Step 1: Select the range of cells you want to name.
Step 2: Click on the ‘Create from Selection’ option from the ‘Defined Names’ grouping in the ‘Formulas’ tab.
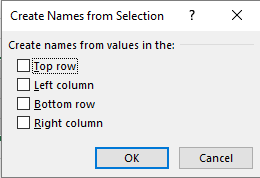
A dialogue box as follows will appear.
You can assign the name for the range by using options like ‘Top row’, ‘Left column’, ‘Bottom row’ and ‘Right Column’. Do note that only non-empty cells will be named by this procedure.
How to Define a Name Using the ‘New Name’ dialogue box?
Step 1: Select the range of cells that you want to name.
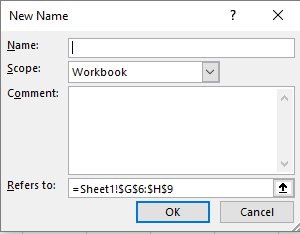
Step 2: Click on the ‘Define Name’ option from the ‘Defined Names’ grouping in the ‘Formulas’ tab. The ‘New name’ dialogue box will appear.
Step 3: In the ‘Name’ textbox, type the desired name.
Step 4: In the ‘Scope’ dropdown list, you can define the scope of the name as the workbook or one of the sheets within.
Step 5: In the ‘Comment’ textbox, you can add a description, which is optional. The ‘Refers to’ box will show you the reference of the cells.
Click ‘Ok’ once you are done.
Defining and Managing Names in Excel- How to Manage Names?
Click on the ‘Name Manager’ option in the ‘Defined Names’ grouping in the ‘Formulas’ tab. You will get the following dialogue box where the particulars about the defined names shall be mentioned.
Example:
Radhika wants to name a range of cells with her name so that her brother doesn’t confuse her cells with his on the same worksheet. how will she do it?
Solution
She can select the range of cells that belongs to her and then click on the ‘Define Name’ option from the ‘Defined Names’ grouping in the ‘Formulas’ tab. The ‘New name’ dialogue box will appear. In the ‘Name’ textbox, she should type ‘Radhika’. In the ‘Scope’ dropdown list, she can define the scope of the name as the worksheet. She should click ‘Ok’ once she is done.


