Here in this article we will discuss about the Android Activity and Life Cycle following topics
- Discuss about term Activity.
- Lifecycle of Activity.
- Discuss about Intent and communicate between activities.
Android Activity
Android Activity is a screen which appears on the device when you execute one of the apps. Activity forms a window on a device in which you placed your design files or UI, by using setContenView() method.
setContentView() method is called in onCreate() method of activity lifecycle, which tells the environment that window is created and view can be placed in it without any problem.We discuss activity life cycle methods in next paragraph.
Life cycle of Activity
There is an activity stack .When new activity is created, it gets placed on the top of stack and previous activity comes under the new activity in stack. Previous activity only comes into foreground when new activity is destroyed and pop out from activity stack. There are following methods defined which get called in different situations.
1) onCreate(Bundle savedInstanceState)
- This method is called when you start the application and in this method, view is set, which is the design of that particular screen.
- In this method, you can initialize the variables and controls which are defined in design i.e textview, edittext , button etc. We will cover different views in next blog.
- Also set listeners to controls in this method for better functionality, listeners can be of any types like onClickListener(), onFocusChanged() , onEditorChanged() etc.
2) onStart()
This method is called after onCreate method on start of application, when screen becomes visible to user.
3) onResume()
This method is called when user start interacting with activity, when already created activity comes into foreground the onRestart=>onStart=>onResume are called in this sequence. At this time, android activity is on the top of stack. Here you can reinitialize your notification receivers or call any API for data fetching.
4) onPause()
This method is called when android activity goes into background , here one release notification receiver resources if in use , stop animations and other operations which are utilizing CPU time.
5) onStop()
Called when the current android activity is no longer visible to the user, because another android activity has been resumed and is covering this one and now another android activity is on top.
6) onRestart()
Called after current android activity has been stopped, prior to it being started again. onStart() and onResume() methods are called following onRestart().
7) onDestroy()
Called when activity is finishing or system destroy instance due to memory problem or garbage collector destroy instance object. On pressing back button ,android activity get destroyed and all the resources get free which are occupied by activity earlier.
Intent in Android
An intent is a description of the operation which is to be performed in different – different conditions. An Intent provides a facility for performing late run time binding between the code in different applications .An intent is used to start new activity from current activity, communicate with service and can send information to broadcast receivers.
There are two type of intents:
1.Implicit Intent.
2.Explicit Intent.
Implicit Intent
This intent not need the name of component, instead it declare a general action to perform. It means if user wants to dial a specific number , then this intent opens another capable app which can perform this function, here phone keypad is opened and using phone services app number is dialed to respective person. Another is if user wants to find location on a map , then MAPS app is opened and locate the desired location in it.
Below is the Implicit Intent Code
if (ActivityCompat.checkSelfPermission(PadhleActivity.this,
        Manifest.permission.CALL_PHONE) == PackageManager.PERMISSION_GRANTED) {

    Intent callintent = new Intent(Intent.ACTION_CALL,
 Uri.parse("tel:" + phone.getText().toString().trim()));
    startActivity(callintent);
}else {
    final String[] PERMISSIONS_STORAGE = {Manifest.permission.CALL_PHONE};
    //Asking request Permissions
    ActivityCompat.requestPermissions(PadhleActivity.this, PERMISSIONS_STORAGE, 1);
}
@Override
public void onRequestPermissionsResult(int requestCode, @NonNull String[] permissions,
 @NonNull int[] grantResults) {
    super.onRequestPermissionsResult(requestCode, permissions, grantResults);
    boolean permissionGranted = false;
    switch(requestCode){
        case 1:
            permissionGranted = grantResults[0]== PackageManager.PERMISSION_GRANTED;
            break;
    }
    if(permissionGranted){
        Intent callintent = new Intent(Intent.ACTION_CALL,
 Uri.parse("tel:" + phone.getText().toString().trim()));
        startActivity(callintent);
    }else {
        Toast.makeText(PadhleActivity.this, "You don't assign permission.", Toast.LENGTH_SHORT).show();
    }
}
Explicit Intent in Android
This intent need the name of component, here we pass the activity name to which we want to pass our control. For example , we have a list of cars in one of the screen of application , we want the functionality that when we click on one of car in list, a new screen appears with car’s full details. So, we can open new activity and pass details of car item using an explicit intent. Another example , if we have user first name and last name on one screen and we pass it to other screen then two activities communicate using explicit intent.
Below is the Explicit Intent Code
public void explicitIntent()
{
    Intent intent=new Intent(PadhleActivity.this,SecondActivity.class);
    intent.putExtra("firstname",firstName.getText().toString().trim());
    intent.putExtra("lastname",lastName.getText().toString().trim());
    startActivity(intent);
}
1. Create new project in android studio
- Go to File => New=>New Project and name it BuildUIwithActivity, click next and select Empty Activity from templates and name it PadhleActivity.
- Add below files for colors and strings to be added in project.
colors.xml
<resources>
    <color name="colorPrimary">#3F51B5</color>
    <color name="colorPrimaryDark">#303F9F</color>
    <color name="colorAccent">#FF4081</color>
</resources>
strings.xml
<resources>
    <string name="app_name">BuildUIwithActivity</string>
    <string name="firstName">FirstName</string>
    <string name="lastName">LastName</string>
    <string name="phone">Phone</string>
    <string name="call">Call</string>
    <string name="next">Next</string>
    <string name="back">Back</string>
</resources>
2 . Add permission in Manifest file.
<manifest xmlns:android="http://schemas.android.com/apk/res/android"
    package="com.example.rajesh.builduiwithactivity">

    <uses-permission android:name="android.permission.CALL_PHONE" />

    <application
        android:allowBackup="true"
        android:icon="@mipmap/ic_launcher"
        android:label="@string/app_name"
        android:roundIcon="@mipmap/ic_launcher_round"
        android:supportsRtl="true"
        android:theme="@style/AppTheme">
        <activity android:name=".PadhleActivity">
            <intent-filter>
                <action android:name="android.intent.action.MAIN" />

                <category android:name="android.intent.category.LAUNCHER" />
            </intent-filter>
        </activity>
        <activity android:name=".SecondActivity"></activity>
    </application>

</manifest>
3. Add PadhleActivity.java
import android.Manifest;
import android.content.Intent;
import android.content.pm.PackageManager;
import android.net.Uri;
import android.support.annotation.NonNull;
import android.support.v4.app.ActivityCompat;
import android.support.v7.app.AppCompatActivity;
import android.os.Bundle;
import android.util.Log;
import android.view.View;
import android.widget.EditText;
import android.widget.TextView;
import android.widget.Toast;

public class PadhleActivity extends AppCompatActivity {

    private static final String TAG="PadhleActivity";
    TextView call,next;
    EditText firstName,lastName,phone;

    @Override
    protected void onCreate(Bundle savedInstanceState) {
        super.onCreate(savedInstanceState);
        setContentView(R.layout.activity_padhle);
        initialize();

        Log.e(TAG,"On Create Called");


        call.setOnClickListener(new View.OnClickListener() {
            @Override
            public void onClick(View v) {
                    if (ActivityCompat.checkSelfPermission(PadhleActivity.this,
                            Manifest.permission.CALL_PHONE) == PackageManager.PERMISSION_GRANTED) {

                        Intent callintent = new Intent(Intent.ACTION_CALL,
 Uri.parse("tel:" + phone.getText().toString().trim()));
                        startActivity(callintent);
                    }else {
                        final String[] PERMISSIONS_STORAGE = {Manifest.permission.CALL_PHONE};
                        //Asking request Permissions
                        ActivityCompat.requestPermissions(PadhleActivity.this, PERMISSIONS_STORAGE, 1);
                    }
                }
        });

        next.setOnClickListener(new View.OnClickListener() {
            @Override
            public void onClick(View v) {
                explicitIntent();
            }
        });
    }

    public void initialize()
    {
        firstName=findViewById(R.id.firstName);
        lastName=findViewById(R.id.lastName);
        phone=findViewById(R.id.phone);
        call=findViewById(R.id.call);
        next=findViewById(R.id.next);
    }

    public void explicitIntent()
    {
        Intent intent=new Intent(PadhleActivity.this,SecondActivity.class);
        intent.putExtra("firstname",firstName.getText().toString().trim());
        intent.putExtra("lastname",lastName.getText().toString().trim());
        startActivity(intent);
    }

    @Override
    public void onRequestPermissionsResult(int requestCode, @NonNull String[] permissions,
 @NonNull int[] grantResults) {
        super.onRequestPermissionsResult(requestCode, permissions, grantResults);
        boolean permissionGranted = false;
        switch(requestCode){
            case 1:
                permissionGranted = grantResults[0]== PackageManager.PERMISSION_GRANTED;
                break;
        }
        if(permissionGranted){
            Intent callintent = new Intent(Intent.ACTION_CALL,
 Uri.parse("tel:" + phone.getText().toString().trim()));
            startActivity(callintent);
        }else {
            Toast.makeText(PadhleActivity.this, "You don't assign permission.",
 Toast.LENGTH_SHORT).show();
        }
    }

    @Override
    protected void onStart() {
        super.onStart();

        Log.e(TAG,"On Start Called");
    }

    @Override
    protected void onResume() {
        super.onResume();

        Log.e(TAG,"On Resume Called");
    }

    @Override
    protected void onPause() {
        super.onPause();
        Log.e(TAG,"On Pause Called");
    }

    @Override
    protected void onStop() {
        super.onStop();
        Log.e(TAG,"On Stop Called");
    }

    @Override
    protected void onRestart() {
        super.onRestart();
        Log.e(TAG,"On Restart Called");
    }

    @Override
    protected void onDestroy() {
        super.onDestroy();
        Log.e(TAG,"On Destroy Called");
    }


}
4. Now we make changes in xml layout file activity_padhle.xml
<RelativeLayout
    android:layout_height="match_parent"
    android:layout_width="match_parent"
    xmlns:android="http://schemas.android.com/apk/res/android">

    <EditText
        android:layout_width="match_parent"
        android:layout_height="wrap_content"
        android:id="@+id/firstName"
        android:hint="@string/firstName"
        android:padding="5dp"
        android:textSize="15sp"
        android:layout_margin="20dp"
        android:textColor="@android:color/black"
        />

    <EditText
        android:layout_width="match_parent"
        android:layout_height="wrap_content"
        android:id="@+id/lastName"
        android:hint="@string/lastName"
        android:padding="5dp"
        android:textSize="15sp"
        android:layout_margin="20dp"
        android:textColor="@android:color/black"
        android:layout_below="@+id/firstName"
        />

    <EditText
        android:layout_width="match_parent"
        android:layout_height="wrap_content"
        android:id="@+id/phone"
        android:hint="@string/phone"
        android:padding="5dp"
        android:textSize="15sp"
        android:layout_margin="20dp"
        android:textColor="@android:color/black"
        android:layout_below="@+id/lastName"
        android:inputType="phone"
        />

    <LinearLayout
        android:layout_width="match_parent"
        android:layout_height="wrap_content"
        android:id="@+id/btnLayout"
        android:layout_below="@+id/phone"
        >

        <TextView
            android:layout_width="0dp"
            android:layout_height="wrap_content"
            android:text="@string/call"
            android:id="@+id/call"
            android:background="@android:color/black"
            android:textColor="@android:color/white"
            android:textSize="16sp"
            android:padding="5dp"
            android:layout_weight="1"
            android:layout_margin="30dp"
           android:gravity="center"
            />

        <TextView
            android:layout_width="0dp"
            android:layout_height="wrap_content"
            android:text="@string/next"
            android:id="@+id/next"
            android:background="@android:color/black"
            android:textColor="@android:color/white"
            android:textSize="16sp"
            android:padding="5dp"
            android:layout_weight="1"
            android:layout_margin="30dp"
            android:gravity="center"

            />

    </LinearLayout>


</RelativeLayout>
5. Now we create second activity on which we pass firstname and lastname using intent.
import android.support.v7.app.AppCompatActivity;
import android.os.Bundle;
import android.view.View;
import android.widget.TextView;

public class SecondActivity extends AppCompatActivity {

    TextView fullname,back;

    @Override
    protected void onCreate(Bundle savedInstanceState) {
        super.onCreate(savedInstanceState);
        setContentView(R.layout.activity_second);
        initialize();

        String firstname=getIntent().getStringExtra("firstname");
        String lastname=getIntent().getStringExtra("lastname");

        fullname.setText("Welcome "+firstname+" "+lastname);

        back.setOnClickListener(new View.OnClickListener() {
            @Override
            public void onClick(View v) {
                finish();
            }
        });
    }

    public  void initialize()
    {
        fullname=findViewById(R.id.fullname);
        back=findViewById(R.id.back);
    }

}
6. Now we make changes in xml layout file activity_second.xml.
<RelativeLayout
    android:layout_height="match_parent"
    android:layout_width="match_parent"
    xmlns:android="http://schemas.android.com/apk/res/android">

    <TextView
        android:layout_width="match_parent"
        android:layout_height="wrap_content"
        android:id="@+id/fullname"
        android:gravity="center"
        android:textSize="15sp"
        android:padding="5dp"
        android:layout_marginTop="30dp"
        android:textColor="@android:color/black"
        />

    <TextView
        android:layout_width="wrap_content"
        android:layout_height="wrap_content"
        android:id="@+id/back"
        android:text="@string/back"
        android:layout_centerInParent="true"
        android:padding="5dp"
        android:textSize="16sp"
        android:background="@android:color/black"
        android:textColor="@android:color/white"
        />

</RelativeLayout>
7. Now run the above program and Below see the logs output below.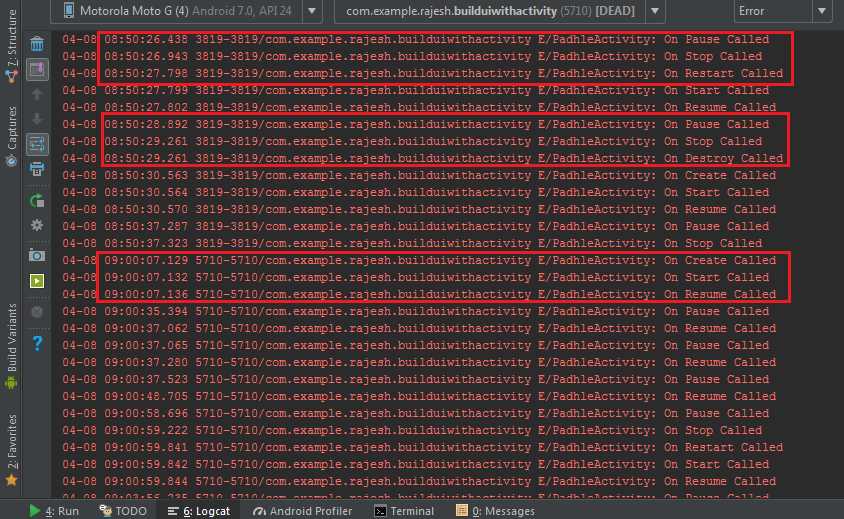
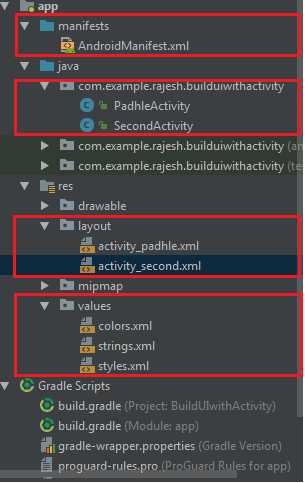
Project Structure
Hope you find this Android Activity and Life Cycle tutorial useful , If you have any question or query just post in the comments and you can also enroll for our Android app development online training.