So we will continue to build out todo list app where we left in this post “Build A Todo List App In Django-Part 1“.
So first change the styles.css file as following to add some styling to our todo list app.This file is simple css,so i am not going to explain it.
body {
    background: rgba(44, 62, 80, .8);
    font-family: 'Oswald', 'Futura', sans-serif;
}

#wrapper {
    margin-top: 10% !important;
}

#content {
    background: beige;
    padding: 25px;
}

#content>h2 {
    font-size: 18px;
    text-align: center;
    padding-top: 0;
}

.t10 {
    margin-top: 10px;
}

.t20 {
    margin-top: 20px;
}

.todo-completed {
    text-decoration: line-through;
    background: rgba(149, 165, 166, .3);
}

footer {
    margin-top: 20px;
    color: white;
}

.list-group-item {
    color: black;
}
After that you can do the following changes in index.html template to connect with styles.css file.
{% load static %}
<!DOCTYPE html>

<html lang="en">

<head>
    <meta charset="utf-8">
    <meta http-equiv="X-UA-Compatible" content="IE=edge">
    <meta name="viewport" content="width=device-width, initial-scale=1">
    <title>ToDo App</title>

    <link href="https://fonts.googleapis.com/css?family=Oswald" rel="stylesheet">

    <!-- Bootstrap CSS -->
    <link rel="stylesheet" href="{% static 'todo/bs/css/flatly.min.css' %}" />
    <link rel="stylesheet" href="{% static 'todo/styles.css' %}" />

</head>

<body>

    <div class="container-fluid" id="wrapper">

        <div class="row">
            <div class="col-lg-4 col-lg-offset-4" id="content">
                <h2>WHAT DO YOU WANT TO DO TODAY?</h2>

                <form action="#" method="POST" role="form">

                    <div class="form-group">
                        <div class="input-group">
                            <input type="text" class="form-control" placeholder="Enter todo e.g. Delete junk files" aria-label="Todo" aria-describedby="add-btn">
                            <span class="input-group-btn">
								  <button type="submit" class="btn btn-default" id="add-btn">ADD</button>
							  </span>
                        </div>
                    </div>
                </form>

                <div class="row t10">
                    <div class="col-lg-12">
                        <div class="btn-toolbar">
                            <div class="btn-group">
                                <button type="button" class="btn btn-warning">
										<i class="glyphicon glyphicon-trash"></i> DELETE COMPLETED
									</button>
                            </div>
                            <div class="btn-group">
                                <button type="button" class="btn btn-warning">
										<i class="glyphicon glyphicon-trash"></i> DELETE ALL
									</button>
                            </div>
                        </div>
                    </div>
                </div>

                <ul class="list-group t20">
                    <li class="list-group-item">Create my new awesome website.</li>
                    <li class="list-group-item todo-completed">Attend weekly coding session.</li>
                    <li class="list-group-item">Visit the gym.</li>
                </ul>
            </div>
        </div>

    </div>

    <!-- jQuery -->
    <script src="./bs/js/jquery.min.js"></script>
    <!-- Bootstrap JavaScript -->
    <script src="./bs/js/bootstrap.min.js"></script>
</body>

</html>
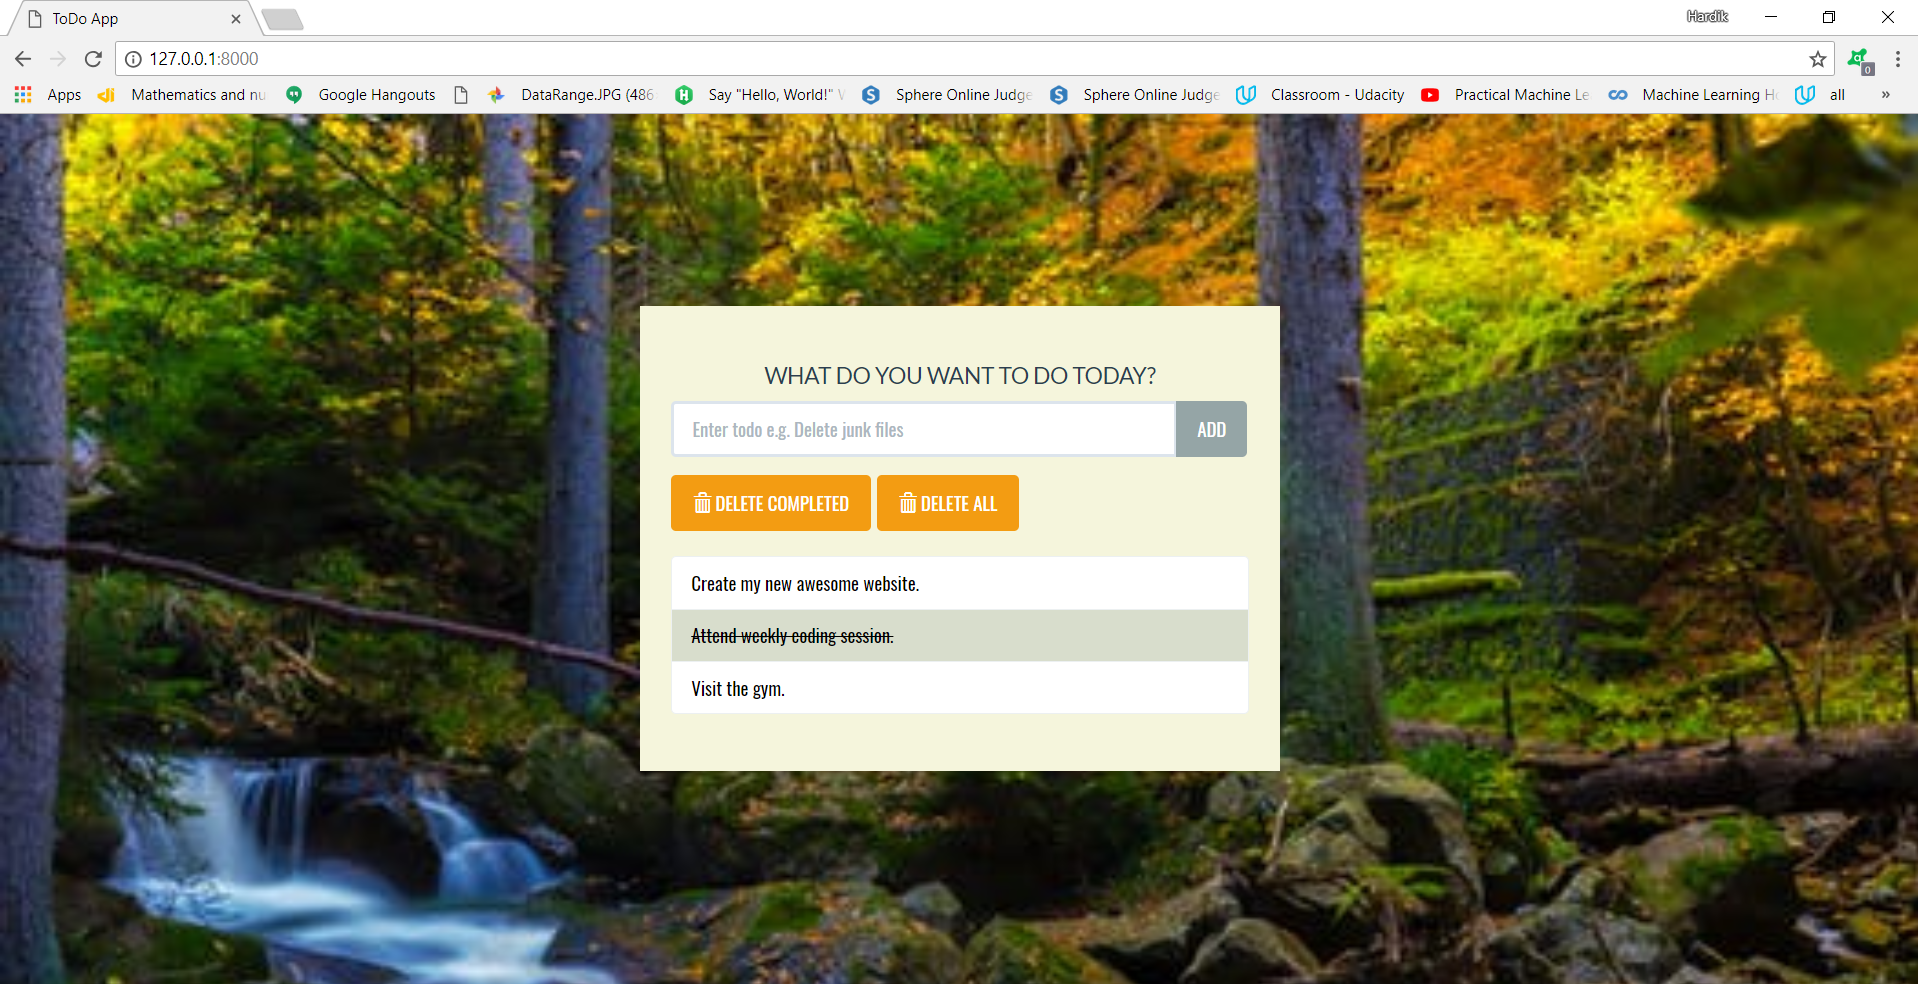
After that you can run the server,you would be able to see the following screen.I have also added background image,you can also add any if you want.Also you have to add some bootstrap files to apply.So you can take a look at this repository https://bitbucket.org/hmr_270/todo-list-app/src/master/ and can match your project with this.You can add files which are not in your project from this repository and match your project with this.After that you will be able to see the same screen.
So now we are done with the looking part of the app,we will start doing work with storing the work,deleting the work in database.
So first create a model like below in the todo/models.py file as following:
from django.db import models

# Create your models here.
class Todo(models.Model):
    text = models.CharField(max_length=40)
    complete = models.BooleanField(default=False)

    def __str__(self):
        return self.text
So in this todo model we are storing two field one is text field-the task which we have to complete and one boolean field which shows either a task is completed or not.At the end we are showing text field.
Now after that register that model in the todo/admin.py file as following:
from django.contrib import admin

from . models import Todo

# Register your models here.

admin.site.register(Todo)
So after that make a migration file by typing python manage.py makemigrations and apply that migration file to database by typing python manage.py migrate.
Now you can create a superuser and can log in to admin section to see whether Todo model is registered or not.
So in this post we have applied some css to index.html template and also create one model for storing data.