Now in this post , we will discuss about the how to capture image in android and store it to the firebase database.In a project, we face situation when we have to upload images, audio or video files. These type of media files can’t be stored in realtime firebase database directly.In order to save the media, first we have to store it on storage then we take the reference of link and store that reference link path in realtime firebase database.After that we can access that media file by accessing that reference link.There are different methods to access files.
You can either access those files with the help of downloaded Url or you can just take the reference of path on which that file is stored and you can access it by filename.
Now, we proceed with click of image by your mobile camera first.
Capture Image from camera in android
Step 1 ) Make function to capture image from camera in android
Function : Here we will learn how to capture image from camera in android using firebase.
Description :
1) Click image from camera
2) Store image in android server firebase storage.
3)Download image from server in your application.
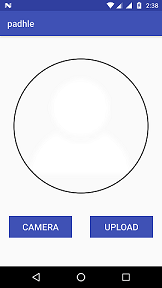
Before Capturing Image in android screen shots
we have two buttons “Camera” and “Upload”.Here when we click on camera button and capture the image .
Pseudo code to Click image from camera
1) Here, we created the final variable “CAMIMAGE” which is a request code to be passed in when activity get started.
2) We create an intent and set it’s type such that it goes to camera and click picture from it and when you save that picture,then that picture is saved as data for that particular intent which get extracted by us accordingly.
3) Data is associated with intent by MediaStore.EXTRA_OUTPUT .EXTRA_OUTPUT fetched data from physical path where clicked image is stored and also include the path of image which we called Uri.
4) startActivityForResult(intent, CAMIMAGE) method start activity for intent which is implicit in nature after this call.
5)If condition which is on top of code snippet checks whether device have camera or not, if camera is not present then you can show dialog to user that mobile doesn’t have camera so this functionality will not work in it.
6) onActivityResult(int requestCode, int resultCode, Intent data) method get called which contain 3 arguments requestCode which is equal to value of CAMIMAGE, resultCode which tells about whether data is transferred from intent to activity successfully or not and “data” which contain the path of selected image.
Code for how to capture image in android
public void onClick(View v) {

    switch(v.getId())
    {
        case R.id.btnCamera:
            if (hasCamera()) {
                Intent takePictureIntent = new Intent(MediaStore.ACTION_IMAGE_CAPTURE);
                // Ensure that there's a camera activity to handle the intent
                if (takePictureIntent.resolveActivity(getPackageManager()) != null) {
                    // Create the File where the photo should go
                    File photoFile = null;
                    try {
                        photoFile = createImageFile();
                    } catch (IOException ex) {
                        // Error occurred while creating the File

                    }
                    // Continue only if the File was successfully created
                    if (photoFile != null) {
                        takePictureIntent.putExtra(MediaStore.EXTRA_OUTPUT,
                                Uri.fromFile(photoFile));
                        filePath = Uri.fromFile(photoFile);
                        Log.e("Uri ", filePath + "");
                        startActivityForResult(takePictureIntent, CAMIMAGE);
                    }
                }

            }
            break;

        case R.id.btnUpload:
            uploadToStorage();
            break;
    }
}

// create image file method used in above function
 private File createImageFile() throws IOException {
 // Create an image file name
 String timeStamp = new SimpleDateFormat("yyyyMMdd_HHmmss").format(new Date());
 String imageFileName = "JPEG_" + timeStamp + "_";
 String storageDir = Environment.getExternalStorageDirectory() + "/picupload";
 File dir = new File(storageDir);
 if (!dir.exists())
 dir.mkdir();

 File image = new File(storageDir + "/" + imageFileName + ".jpg");

 // Save a file: path for use with ACTION_VIEW intents
 mCurrentPhotoPath = image.getAbsolutePath();
 Log.e("photo path = " , mCurrentPhotoPath);

 return image;
 }

// to check whether camera is present or not
 private boolean hasCamera()
 {
 return getPackageManager().hasSystemFeature(PackageManager.FEATURE_CAMERA_ANY);
 }

// it is used to crop the image in android
 @Override
 protected void onActivityResult(int requestCode, int resultCode, Intent data) {
 if(requestCode == CAMIMAGE && resultCode == RESULT_OK)
 {
 CropImage.activity(filePath).setAspectRatio(1,1)
 .start(this);
 }
 if (requestCode == CropImage.CROP_IMAGE_ACTIVITY_REQUEST_CODE) {
 CropImage.ActivityResult result = CropImage.getActivityResult(data);
 Uri resultUri = result.getUri();
 imageLayout.setImageURI(resultUri);
 }

 }
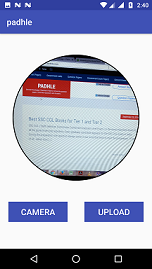
Output : Camera has opened and image is clicked. Below is the after screen shot.
Now it time to store the image in firebase database.
Code for how to store image in Firebase database
Description of the code
1) We create the name of image on the basis of current timestamp here, it’s your choice you can give any name but if you try to upload two different images of same name on same path, then latter one replaces the previous one results into loss of data.
2) riversRef is a reference to storage where your images get stored.
3) riversRef.putFile(filePath) here you put your file in putFile method and call it , this method took file from that path and upload it to server , it first get converted into bytes then byteArray formed out of it and finally bytes get transferred to referred path in storage reference.
4) addOnSuccessListener called when task got completed that is file got uploaded, this listener acknowledges us.
5) On success you got downloadUrl which is the exact url of uploaded image, you can use it in future to download same image with the help of Glide or Picasso or any other tool.
6) addOnFailureListener called when there is server side problem or image is too large and memory exception occur, there can be any reason , it tells that image is not uploaded as required.
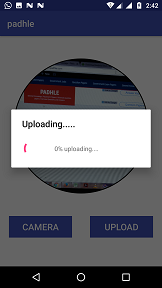
7) addOnProgressListener tells about the current situation of uploading that is how much data is uploaded and how much is left.
// store image to firebase database
private void uploadToStorage()
{
    if(filePath != null) {

        final ProgressDialog progressdialog=new ProgressDialog(this);
        progressdialog.setTitle("Uploading.....");
        progressdialog.show();

        final String _imgName=System.currentTimeMillis()/1000+"_img.jpg";

        StorageReference riversRef = mStorageRef.child("userImages/"+_imgName);

        Bitmap bitmap=null;
        try{
            bitmap = MediaStore.Images.Media.getBitmap(this.getContentResolver(), filePath);
        }
        catch(Exception e)
        {
            e.printStackTrace();
        }
        //compress image

        ByteArrayOutputStream baos = new ByteArrayOutputStream();
        bitmap.compress(Bitmap.CompressFormat.JPEG, 20, baos);
        byte[] data = baos.toByteArray();


        riversRef.putBytes(data)
                .addOnSuccessListener(new OnSuccessListener<UploadTask.TaskSnapshot>() {
                    @Override
                    public void onSuccess(UploadTask.TaskSnapshot taskSnapshot) {

                        progressdialog.dismiss();
                        Toast.makeText(getApplicationContext(),"Successfully uploaded",
Toast.LENGTH_SHORT).show();
                        //imageView.setImageBitmap(null);
                        Log.e("upload : ","Success");
                        @SuppressWarnings("VisibleForTests")Uri downloadUrl
 = taskSnapshot.getDownloadUrl();
                        Log.e("downloadUrl-->", "" + downloadUrl);


                    }
                })
                .addOnFailureListener(new OnFailureListener() {
                    @Override
                    public void onFailure(@NonNull Exception exception) {
                        progressdialog.dismiss();
                        Toast.makeText(getApplicationContext(),exception.getMessage()
,Toast.LENGTH_SHORT).show();

                    }
                })
                .addOnProgressListener(new OnProgressListener<UploadTask.TaskSnapshot>() {
                    @Override
                    public void onProgress(UploadTask.TaskSnapshot taskSnapshot) {


                        @SuppressWarnings("VisibleForTests")double progress=
(100.0 * taskSnapshot.getBytesTransferred())/taskSnapshot.getTotalByteCount();

                        progressdialog.setMessage(((int) progress) + "% uploading....");

                    }
                }) ;
    }
}
Output : Image is uploaded to firebase database
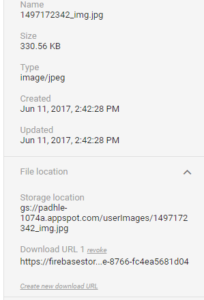
Properties of image stored in firebas database
Here is the complete code to capture the image in android from camera and store it to the firebase database
Description :
Step 1 ) Click on button “Camera”.
Step 2 ) Camera will open .
Step 3 ) Capture the image.
Step 4 ) Crop the image.
Step 5 ) Click ok to upload the image.
Step 6 ) Click upload button to upload the image on server.
Note : Connect your app with firebase database
import android.app.ProgressDialog;
import android.content.Intent;
import android.content.pm.PackageManager;
import android.graphics.Bitmap;
import android.net.Uri;
import android.os.Environment;
import android.os.StrictMode;
import android.provider.MediaStore;
import android.support.annotation.NonNull;
import android.support.v7.app.AppCompatActivity;
import android.os.Bundle;
import android.util.Log;
import android.view.View;
import android.widget.Button;
import android.widget.Toast;

import com.google.android.gms.tasks.OnFailureListener;
import com.google.android.gms.tasks.OnSuccessListener;
import com.google.firebase.database.DatabaseReference;
import com.google.firebase.database.FirebaseDatabase;
import com.google.firebase.storage.FirebaseStorage;
import com.google.firebase.storage.OnProgressListener;
import com.google.firebase.storage.StorageReference;
import com.google.firebase.storage.UploadTask;
import com.theartofdev.edmodo.cropper.CropImage;

import java.io.ByteArrayOutputStream;
import java.io.File;
import java.io.IOException;
import java.text.SimpleDateFormat;
import java.util.Date;

import de.hdodenhof.circleimageview.CircleImageView;

public class MainActivity extends AppCompatActivity implements View.OnClickListener {

    private final Integer CAMIMAGE=123;
    FirebaseDatabase db;
    DatabaseReference myRef;
    Uri filePath;
    String mCurrentPhotoPath;
    private StorageReference mStorageRef;

    Button btnCamera;
    Button btnUpload;
    CircleImageView imageLayout;

    @Override
    protected void onCreate(Bundle savedInstanceState) {
        super.onCreate(savedInstanceState);
        setContentView(R.layout.activity_main);

        mStorageRef = FirebaseStorage.getInstance().getReference();

        StrictMode.VmPolicy.Builder builder = new StrictMode.VmPolicy.Builder();
        StrictMode.setVmPolicy(builder.build());
        initialize();
        setListeners();

    }

    public void initialize()
    {
        btnCamera=(Button) findViewById(R.id.btnCamera);
        btnUpload=(Button) findViewById(R.id.btnUpload);
        imageLayout=(CircleImageView) findViewById(R.id.imageLayout);
    }

    public void setListeners()
    {
        btnCamera.setOnClickListener(this);
        btnUpload.setOnClickListener(this);
    }
    private boolean hasCamera()
    {
        return getPackageManager().hasSystemFeature(PackageManager.FEATURE_CAMERA_ANY);
    }
    private File createImageFile() throws IOException {
        // Create an image file name
        String timeStamp = new SimpleDateFormat("yyyyMMdd_HHmmss").format(new Date());
        String imageFileName = "JPEG_" + timeStamp + "_";
        String storageDir = Environment.getExternalStorageDirectory() + "/picupload";
        File dir = new File(storageDir);
        if (!dir.exists())
            dir.mkdir();

        File image = new File(storageDir + "/" + imageFileName + ".jpg");

        // Save a file: path for use with ACTION_VIEW intents
        mCurrentPhotoPath = image.getAbsolutePath();
        Log.e("photo path = " , mCurrentPhotoPath);

        return image;
    }

    private void uploadToStorage()
    {
        if(filePath != null) {

            final ProgressDialog progressdialog=new ProgressDialog(this);
            progressdialog.setTitle("Uploading.....");
            progressdialog.show();

            final String _imgName=System.currentTimeMillis()/1000+"_img.jpg";

            StorageReference riversRef = mStorageRef.child("userImages/"+_imgName);

            Bitmap bitmap=null;
            try{
                bitmap = MediaStore.Images.Media.getBitmap(this.getContentResolver(), filePath);
            }
            catch(Exception e)
            {
                e.printStackTrace();
            }
            //compress image

            ByteArrayOutputStream baos = new ByteArrayOutputStream();
            bitmap.compress(Bitmap.CompressFormat.JPEG, 20, baos);
            byte[] data = baos.toByteArray();


            riversRef.putBytes(data)
                    .addOnSuccessListener(new OnSuccessListener<UploadTask.TaskSnapshot>() {
                        @Override
                        public void onSuccess(UploadTask.TaskSnapshot taskSnapshot) {

                            progressdialog.dismiss();
                            Toast.makeText(getApplicationContext(),"Successfully uploaded"
,Toast.LENGTH_SHORT).show();
                            //imageView.setImageBitmap(null);
                            Log.e("upload : ","Success");
                            @SuppressWarnings("VisibleForTests")Uri downloadUrl =
taskSnapshot.getDownloadUrl();
                            Log.e("downloadUrl-->", "" + downloadUrl);


                        }
                    })
                    .addOnFailureListener(new OnFailureListener() {
                        @Override
                        public void onFailure(@NonNull Exception exception) {
                            progressdialog.dismiss();
                            Toast.makeText(getApplicationContext(),exception.getMessage()
,Toast.LENGTH_SHORT).show();

                        }
                    })
                    .addOnProgressListener(new OnProgressListener<UploadTask.TaskSnapshot>() {
                        @Override
                        public void onProgress(UploadTask.TaskSnapshot taskSnapshot) {


                            @SuppressWarnings("VisibleForTests")double progress
= (100.0 * taskSnapshot.getBytesTransferred())/taskSnapshot.getTotalByteCount();

                            progressdialog.setMessage(((int) progress) + "% uploading....");

                        }
                    }) ;


        }


    }

    @Override
    public void onClick(View v) {

        switch(v.getId())
        {
            case R.id.btnCamera:
                if (hasCamera()) {
                    Intent takePictureIntent = new Intent(MediaStore.ACTION_IMAGE_CAPTURE);
                    // Ensure that there's a camera activity to handle the intent
                    if (takePictureIntent.resolveActivity(getPackageManager()) != null) {
                        // Create the File where the photo should go
                        File photoFile = null;
                        try {
                            photoFile = createImageFile();
                        } catch (IOException ex) {
                            // Error occurred while creating the File

                        }
                        // Continue only if the File was successfully created
                        if (photoFile != null) {
                            takePictureIntent.putExtra(MediaStore.EXTRA_OUTPUT,
                                    Uri.fromFile(photoFile));
                            filePath = Uri.fromFile(photoFile);
                            Log.e("Uri ", filePath + "");
                            startActivityForResult(takePictureIntent, CAMIMAGE);
                        }
                    }

                }
                break;

            case R.id.btnUpload:
                uploadToStorage();
                break;
        }
    }

    @Override
    protected void onActivityResult(int requestCode, int resultCode, Intent data) {
        if(requestCode == CAMIMAGE && resultCode == RESULT_OK)
        {
            CropImage.activity(filePath).setAspectRatio(1,1)
                    .start(this);
        }
        if (requestCode == CropImage.CROP_IMAGE_ACTIVITY_REQUEST_CODE) {
            CropImage.ActivityResult result = CropImage.getActivityResult(data);
            Uri resultUri = result.getUri();
            imageLayout.setImageURI(resultUri);
        }

    }
}
Android manifest.xml Code to capture the image in android
<manifest xmlns:android="http://schemas.android.com/apk/res/android"
    package="com.example.rajesh.padhle">

    <uses-permission android:name="android.permission.INTERNET" />
    <uses-permission android:name="android.permission.READ_EXTERNAL_STORAGE" />
    <uses-permission android:name="android.permission.WRITE_EXTERNAL_STORAGE" />
    <uses-permission android:name="android.permission.CALL_PHONE" />


    <application
        android:allowBackup="true"
        android:icon="@mipmap/ic_launcher"
        android:label="@string/app_name"
        android:roundIcon="@mipmap/ic_launcher_round"
        android:supportsRtl="true"
        android:theme="@style/AppTheme">
        <activity android:name=".MainActivity">
            <intent-filter>
                <action android:name="android.intent.action.MAIN" />

                <category android:name="android.intent.category.LAUNCHER" />
            </intent-filter>
        </activity>
        <activity android:name="com.theartofdev.edmodo.cropper.CropImageActivity"
            android:theme="@style/Base.Theme.AppCompat"/>
    </application>

</manifest>
Build.gradle code
apply plugin: 'com.android.application'

android {
    compileSdkVersion 25
    buildToolsVersion "25.0.2"
    defaultConfig {
        applicationId "com.example.rajesh.padhle"
        minSdkVersion 22
        targetSdkVersion 25
        versionCode 1
        versionName "1.0"
        testInstrumentationRunner "android.support.test.runner.AndroidJUnitRunner"
    }
    buildTypes {
        release {
            minifyEnabled false
            proguardFiles getDefaultProguardFile('proguard-android.txt'), 'proguard-rules.pro'
        }
    }
}

dependencies {
    compile fileTree(dir: 'libs', include: ['*.jar'])
    androidTestCompile('com.android.support.test.espresso:espresso-core:2.2.2', {
        exclude group: 'com.android.support', module: 'support-annotations'
    })
    compile 'com.android.support:appcompat-v7:25.3.1'
    compile 'com.android.support.constraint:constraint-layout:1.0.2'
    compile 'com.google.firebase:firebase-database:10.0.1'
    compile 'com.android.support:design:25.3.1'
    compile 'com.google.firebase:firebase-storage:10.0.1'
    compile 'com.github.bumptech.glide:glide:3.7.0'
    compile 'com.theartofdev.edmodo:android-image-cropper:2.4.3'
    compile 'de.hdodenhof:circleimageview:2.1.0'
    compile 'com.google.firebase:firebase-auth:10.0.1'
    testCompile 'junit:junit:4.12'
}


apply plugin: 'com.google.gms.google-services'
To upload the image to firebase we have to grant access
Go to storage section in firebase and go to “rules” Tab and paste the below code
service firebase.storage {
  match /b/{bucket}/o {
    match /{allPaths=**} {
     allow read: if true;
			allow write: if true;
    }
  }
}
Hope you find this tutorial is useful and gives clear idea about how to capture the image from camera in android.