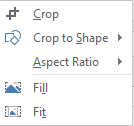
After inserting an image into his Excel sheet, Darsh realizes that he doesn’t want the entire image but only a part of it. He click on the ‘Crop’ option in ‘Picture Tools’ and a dropdown list appears. He is confused with the various options in it. Let us look at what each one of them mean, here.
How to Crop an Inserted Image?
Crop
This option will let him manually adjust the margins to crop his image. He should select the image that he wants to crop and then click on the ‘Crop’ option in the ‘Size’ group of “picture Tools – Format’ tab. The following dropdown list will appear.
 He should now select the ‘Crop’ option. He can now change the black border lines around the picture to include only those areas that he wants to have.
Crop to Shape
This option will let him change the shape of the image to desired one. He should select the image that he wants to crop and then click on the ‘Crop’ option in the ‘Size’ group of “picture Tools – Format’ tab. A dropdown list will appear. He should now select the ‘Crop to Shape’ option. The following dropdown list will appear.
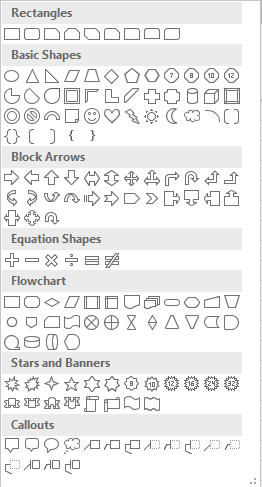
He can choose the shape of his choice from this.
Aspect Ratio
This option will let him change the ‘length : breadth’ ratio of the image to the desired one. He should select the image that he wants to crop and then click on the ‘Crop’ option in the ‘Size’ group of “picture Tools – Format’ tab. A dropdown list will appear. He should now select the ‘Aspect Ratio’ option. The following dropdown list will appear.
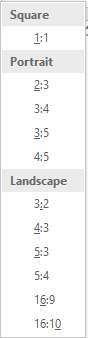 He can choose the ratio of his choice from this.
Fill
This option will let him change the size of the picture by increasing its size, filling in the rest of the area with black. He should select the image that he wants to crop and then click on the ‘Crop’ option in the ‘Size’ group of “picture Tools – Format’ tab. A dropdown list will appear. He should now select the ‘Fill’ option. He can now change the black border lines around the picture to include extra areas that he wants to have.
Fit
This option will let him change the size of the image by minimizing it, filling the rest of the area with white. He should select the image that he wants to crop and then click on the ‘Crop’ option in the ‘Size’ group of “picture Tools – Format’ tab. A dropdown list will appear. He should now select the ‘Fit’ option. He can now change the black border lines around the picture to exclude extra areas that he wants to leave.