What is Data Validation in Excel ?
Any data provided should be accurate and relevant. This is where data validation comes into play. Data validation is a process by which it is ensured that the data one provides is valid, i.e., correct and of some use to the receiver.
How to validate data in Microsoft Excel?
Microsoft Excel is one of the most commonly used software to store data, especially, numerical. This makes it very important for revising the information provided through this. Data Validation in Microsoft Excel can be used to ensure that a user is allowed to enter only certain data, thus restricting and hence refining its quality. It can be used to provide a default message to the user, informing him/her about what kind of data may be entered in the particular cell and further notifying in case of incorrect data.
Following is a step by step procedure for data validation in Microsoft Excel:
- Decide upon the data that may be permitted in each cell.
- Select a cell
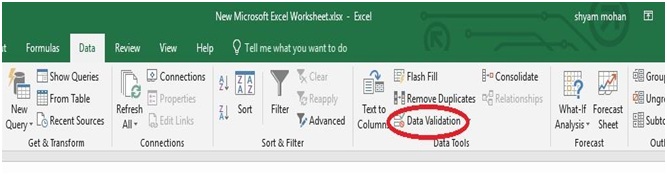
- Click on the ‘Data’ menu on the green bar and select the option ‘Data Validation’. The option can be seen towards the right side of the menu below ‘Flash Fill’ and ‘Remove Duplicates’. A dialogue box is expected to appear.
- Under the ‘Settings’ option, in the dialogue box, one can see an ‘Allow’ drop-down list. 7 options are visible.
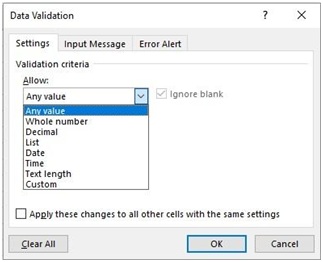
Whole Number: The first one is ‘Whole Number’. This allows the user to only enter numbers that are whole. For example, a number like 8.9 will not be permitted. Along with this, one can also regulate the kind of whole numbers that maybe allowed. The ‘Data’ dropdown list gives you regulators like ‘between’, ‘not between’, ‘equal to’, ‘not equal to’, ’greater than’, ‘less than’, ‘greater than or equal to’ and ‘less than or equal to’. Once you select the option that best suits your purpose, you will receive a textbox(es) that asks for the relevant information.
Decimal: The next option is ‘Decimal’. This allows the user to enter values that are only decimal. The regulators are the same as those for ‘Whole Number’ in the specified cell.
List: This option allows the user to enter a value from the dropdown list provided near the cell. The contents of this dropdown list have to be entered in the ‘Source’ textbox.
Date: This option allows the user to input the dates in the cells. This is particularly useful for HR purposes like monitoring attendance, leave of absence, etc. The ‘Data’ dropdown list remains the same as that for ‘Whole Number’ and ‘Decimal’.
Time: The ‘Time’ option is identical to the ‘Date’ one, except for that one can enter a particular time instead of date.
Text Length: The ‘text length’ option allows you to regulate the data according to how bug or small it is. The regulators remain the same as that of ‘Whole Number’, ‘Decimal’, etc. The difference is that, the user can enter any value (within the given parameters). That is, it can be a whole number or decimal, or even a time, as long as it is within the limits set.
Custom: This option lets the user customize the kind of data that may be entered according to the individual needs of the person/organization. The ‘Formula’ text box must be filled in with the specific formula, the solutions of which, can be entered in the cell.
Choose the option that suits you the most.
- A text box, according to the option you selected, will appear. Enter the relevant details there. Click ‘Ok’.
- Please note that ‘Ignore blank’ and ‘In-cell dropdown’ checkboxes remain selected by default. Do not change these.
- You have set restrictions upon the kind of data that can be entered.
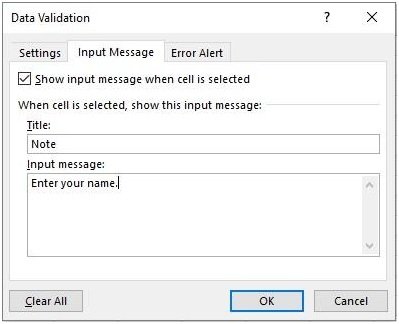
2) Create an ‘Input Message’ to instruct the user about the kind of data that is permitted.
- You can inform the user about the kind of information that maybe entered into a cell by displaying a message that shows this.
- Select a cell
- Click on the ‘Data’ menu on the green bar and select the option ‘Data Validation’. The option can be seen towards the right side of the menu below ‘Flash Fill’ and ‘Remove Duplicates’. A dialogue box is expected to appear.
- Select the ‘Input Message’ option. You will see ‘Title’ and ‘Input Message’ text boxes. Type the necessary heading and message. Click ‘Ok’ once you are done.
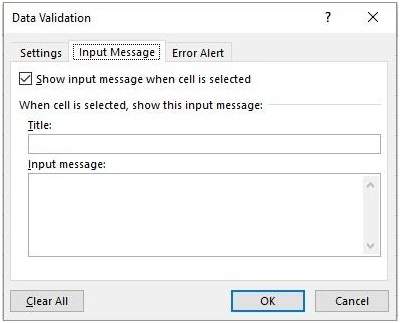
- Please note that ‘Show input message when cell is selected’ checkbox is selected by default. Do not change this.
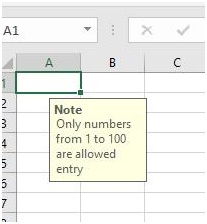
- Expected outcome:
3) Create an ‘Error Alert’ to inform the user when data that is not permitted has been entered.
- Another way to validate your data is to alert the user when they enter data that you do not approve of. To do this, use the following instructions.
- Select a cell
- Click on the ‘Data’ menu on the green bar and select the option ‘Data Validation’. The option can be seen towards the right side of the menu below ‘Flash Fill’ and ‘Remove Duplicates’. A dialogue box is expected to appear.
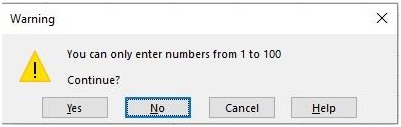
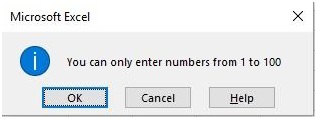
- Select the ‘Error Alert’ option. Choose the style of your alert from the ‘Style’ drop-down list. The ‘Stop’ option will not allow the user to type the data that has been excluded with their only options being to ‘Retry’ or ‘Cancel’, the ‘Warning’ option brings to your notice that you have entered data that is not permitted and asks you if you would like to continue anyway (Click on ‘Yes’ after the warning appears), change it to add valid data (Click on ‘No’ after the warning appears) or remove the invalid entry (Click on ‘Cancel’ after the warning appears) and the ‘Information’ option will simply inform you about the mismatch and you may choose to accept the invalid data (‘Ok’) or reject it (‘Cancel’).
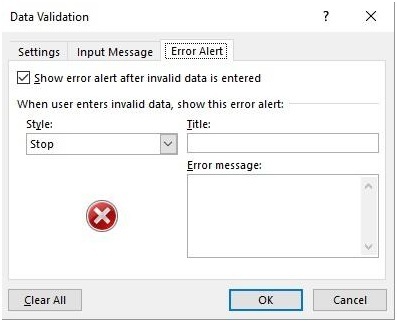
- Enter the relevant information in the ‘Title’ and ‘Error Message’ text boxes. Click ‘Ok’ once you are done.
- Expected Outcome:
Stop:

Warning:
Information:
This way, you can regulate the data entered and make sure that the information entered is relevant and necessary for your purpose.
Example: Let take an example for better understanding for Data Validation in Excel.
Raghav has been given the task to create an Excel Spreadsheet that records the percentages of all the students who have passed in the Maths Class Assessment-5. The passing marks in 40 %. H intends to pass his laptop with the spreadsheet around the class. Write the steps for creating a spreadsheet that would best suit him, with the proper regulations and messages so that he doesn’t have to keep telling the instructions to everyone.
Solution:
- Create a new Microsoft Excel Spreadsheet.
- Select column A and click on the ‘Data’ menu. Click on the ‘Data Validation’ option. A dialogue box will appear.
- Select the ‘Input Message’ option. In the ‘Title’ textbox enter ‘Note’.
- In the ‘Input Message’ textbox enter ‘Enter your name’. Click on ‘Ok’.
- Select column B and click on the ‘Data’ menu. Click on the ‘Data Validation’ option. A dialogue box will appear.
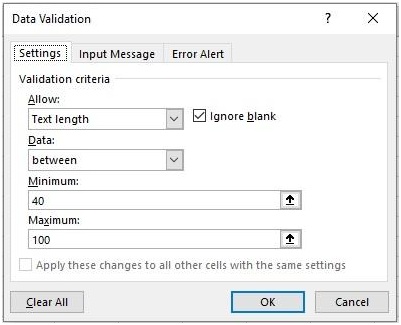
- Under the ‘Settings’ option, click on the ‘Allow’ dropdown list.
- Choose the ‘Text Length’ option. ‘Data’ dropdown list will appear.
- Choose the ‘between’ option. In the ‘Minimum’ textbox, type ‘40’ and in the ‘Maximum’ textbox type ‘100’.
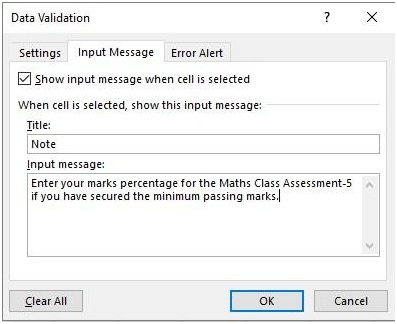
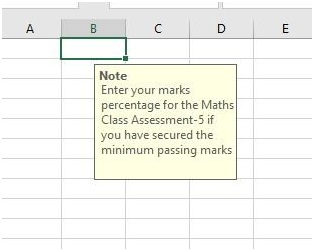
- Select the ‘Input Message’ option. In the ‘Title’ textbox enter ‘Note’.
- In the ‘Input Message’ textbox enter ‘Enter your marks percentage for the Maths Class Assessment-5 if you have secured the minimum passing marks’.
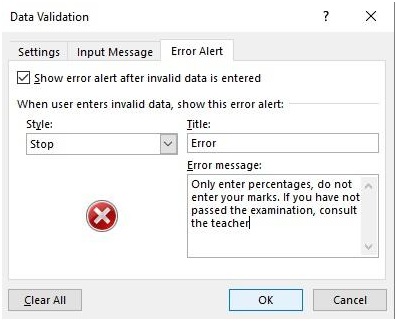
- Choose the ‘Error Alert’ option. From the ‘Style’ dropdown list choose ‘Stop’. In the ‘Title’ textbox enter ‘Error’. In the ‘Error Message’ text box enter ‘Only enter percentages, do not enter your marks. If you have not passed the examination, consult the teacher’.
- Click ‘Ok’ once all the three have been done.
- Click on ‘Save’ icon and Raghav’s desired spreadsheet has been created.
Hope now you have a clear understanding of the Data Validation in Excel. For any doubt mail us or leave n comment section.